
RCS Agent Setup Guide
Create, test and launch your RCS agent in Kudosity
You create, test and launch your RCS agent yourself in the Kudosity app. The process has three steps:
| Step | What you do | Where |
|---|---|---|
| 1. Create your agent | Choose the agent's details, build its public profile and review it. | RCS > RCS Agents > Create agent |
| 2. Test your agent | Add test devices, then send messages to them from the app or the API. | The last step of the wizard, or the agent's Test message tab |
| 3. Request launch | Confirm that testing is complete. Kudosity then works with you to verify your business for launch. | The agent's page |
For what an agent is and how it appears to your customers, see RBM/RCS Agents.
Can't see RCS in the menu?RCS isn't turned on for your account yet. Contact your account manager to have it enabled.
Step 1: Create your agent
In the menu, select RCS > RCS Agents, and then select Create agent. The wizard takes you through the agent's details, its public profile and a review.
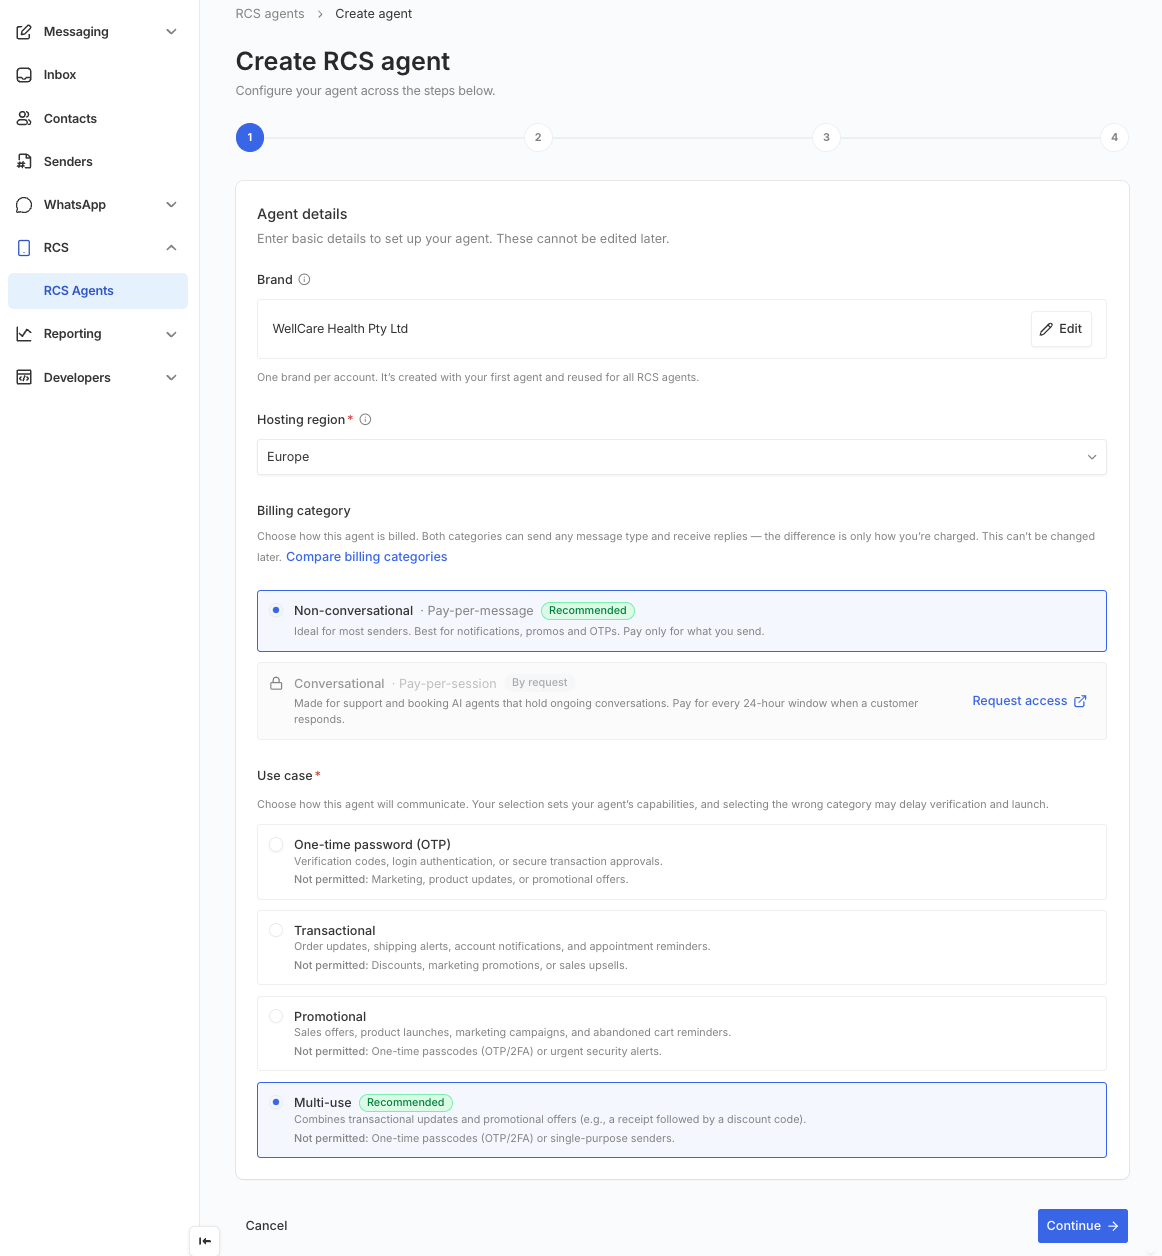
Agent details
These four choices are permanent once the agent is created, so check them carefully.
| Field | What to choose |
|---|---|
| Brand | Your registered business or trading name, up to 40 characters. Your account has one brand. It's created with your first agent and reused after that. |
| Hosting region | Asia Pacific, North America or Europe. This is where your agent operates from and stores its data. Choose it by the regulations that apply to you and by proximity to the people you message. It doesn't limit which countries or mobile networks you can launch in. The RCS Country Availability Guide lists the region for each country. |
| Billing category | Non-conversational (pay per message) is selected for you and suits most senders. Conversational (pay per session) is for agents that hold ongoing two-way conversations, and is available by request. See RCS billing types and message formats. |
| Use case | How the agent communicates. Carriers check that your messages match the use case, and the wrong choice can delay launch. |
The use cases are:
| Use case | Use it for | Not permitted |
|---|---|---|
| Multi-use | Transactional updates and promotional offers from one agent. Suits most businesses. | One-time passwords |
| One-time password (OTP) | Verification codes, login authentication and transaction approvals | Marketing, product updates and promotional offers |
| Transactional | Order updates, shipping alerts, account notifications and appointment reminders | Discounts, promotions and sales upsells |
| Promotional | Sales offers, product launches and marketing campaigns | One-time passwords and urgent security alerts |
Public profile
The public profile is how your brand appears to the people who receive your messages. A phone preview shows the profile as you build it. You can edit the profile until you request launch.
| Field | Requirements |
|---|---|
| Agent name | The name at the top of the conversation. Up to 40 characters. |
| Description | One line under the name. Up to 100 characters of plain text. Say what the agent does. |
| Colour | A six-digit hex colour with a contrast of at least 4.5:1 against white, so pastel colours are rejected. |
| Logo image | 224 × 224 px, PNG or JPEG. Larger images are resized when you upload them. |
| Banner image | 1440 × 448 px, PNG or JPEG. Larger images are resized when you upload them. |
| Phone number and label | The Call button. International format, for example +61412345678. The label can be up to 25 characters. |
| Email and label | The Email button. The label can be up to 25 characters. |
| Website and label | The Website button. An http or https address. The label can be up to 25 characters. |
| Privacy policy | A public https URL that opens without a login. Carriers open it when they review the agent. |
| Terms of service | A public https URL that opens without a login. Carriers open it when they review the agent. |
The profile needs at least one way to contact you: a phone number, an email address or a website.
Review
Check the summary. An agent can't be deleted once it's created, and the brand, hosting region, billing category and use case can't be changed. Select the confirmation, and then select Create agent.
Step 2: Test your agent
A new agent starts in Ready for testing. Until the agent is live, it can message its test devices only.
The last step of the wizard is a first test. The same test devices and Send a test message card are on the agent's Test message tab, so you can come back and test at any time.
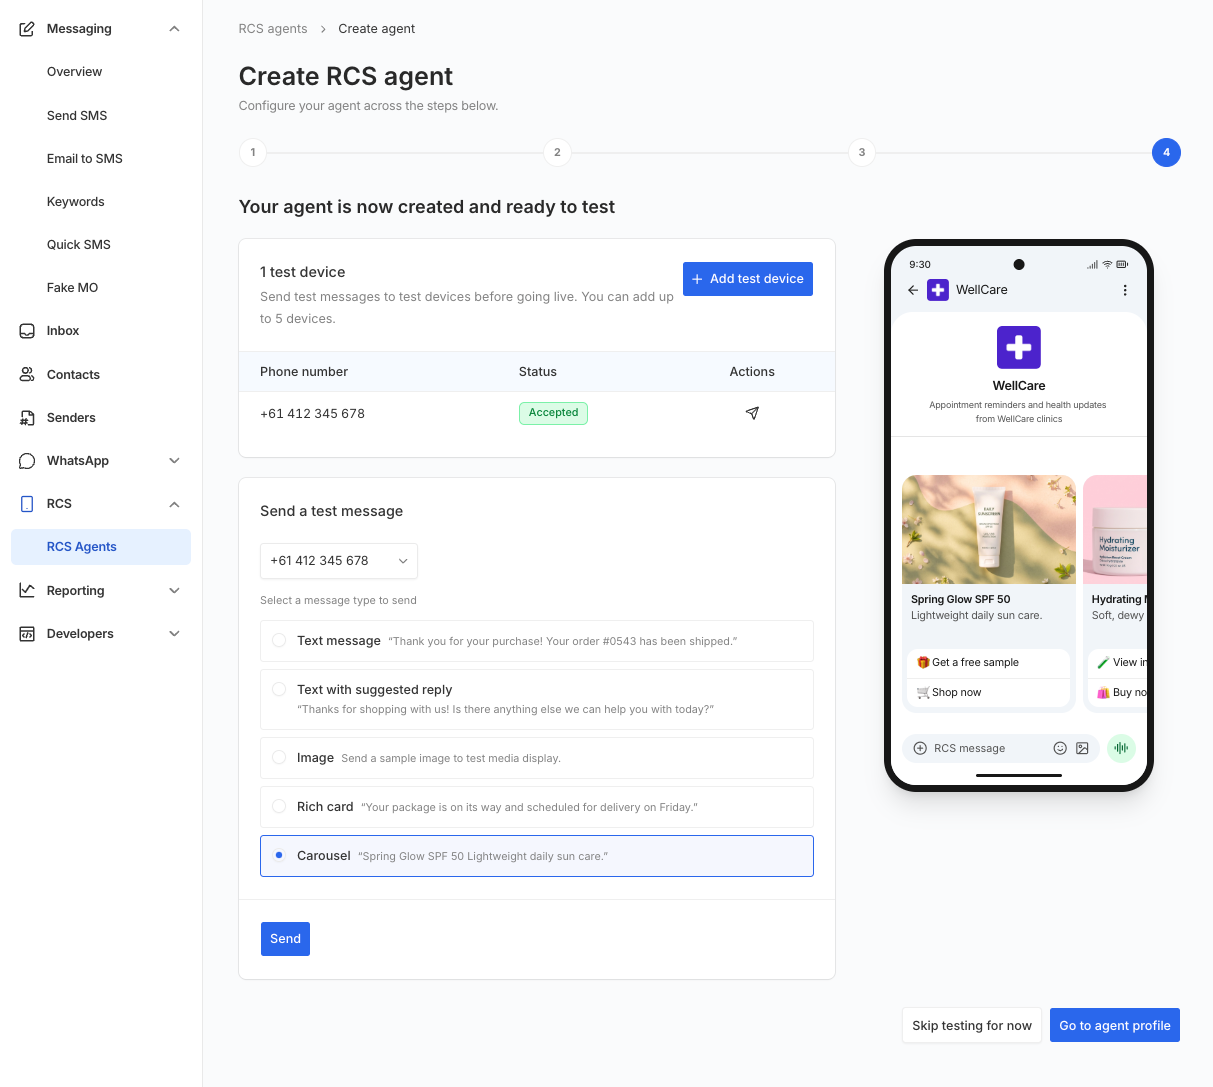
A test device is a phone that can receive RCS:
- Android: any Android phone with RCS turned on in Google Messages.
- iPhone: an iPhone on iOS 18 or later with RCS turned on, in countries where RCS business messaging is available on iPhone. It isn't yet available on iPhones that use Australian mobile networks, so use an Android phone to test with an Australian number.
To send a test message from the app:
- Select Add test device. Enter the mobile number in international format, for example
+61412345678, and then select Add device. You can add up to 5 devices, and a device can't be removed after you add it. - Accept the invitation on the phone. The device's status changes from Pending to Accepted.
- Under Send a test message, choose the device and one of the sample messages: text, text with a suggested reply, image, rich card or carousel. Then select Send.
- Check the phone. The message arrives from your branded profile, with your logo, name and description. Until the agent is live, some mobile networks label it as unverified.
Test with the API
You can also send your own messages to an accepted test device with the Send RCS message endpoint. Use the agent's Agent ID as the sender. The Agent ID is under Agent details on the agent's Details tab.
curl --request POST \
  --url https://api.transmitmessage.com/v2/rcs/messages \
  --header "x-api-key: $KUDOSITY_API_KEY" \
  --header "Content-Type: application/json" \
  --data '{
    "sender": "wellcare_6947ebfc_agent",
    "recipient": "61412345678",
    "content_type": "text",
    "content": {
      "text": {
        "message": "Your appointment is confirmed for Thursday at 10am."
      }
    }
  }'
Replace the sender with your own Agent ID, and the recipient with one of your accepted test devices. To build images, rich cards, carousels and suggested replies, see the RCS Message Guide.
Step 3: Request launch
Test thoroughly before you request launch. After you request it, the profile is locked and carriers review the agent as you submitted it. A change after that point needs Kudosity's help and can mean a new verification.
Before you request launch, check that:
- Test messages arrive on each test device from your branded profile, with the right name, description, logo and banner.
- The Call, Email and Website buttons work.
- The privacy policy and terms of service links open without a login.
- The messages you plan to send match the use case you chose.
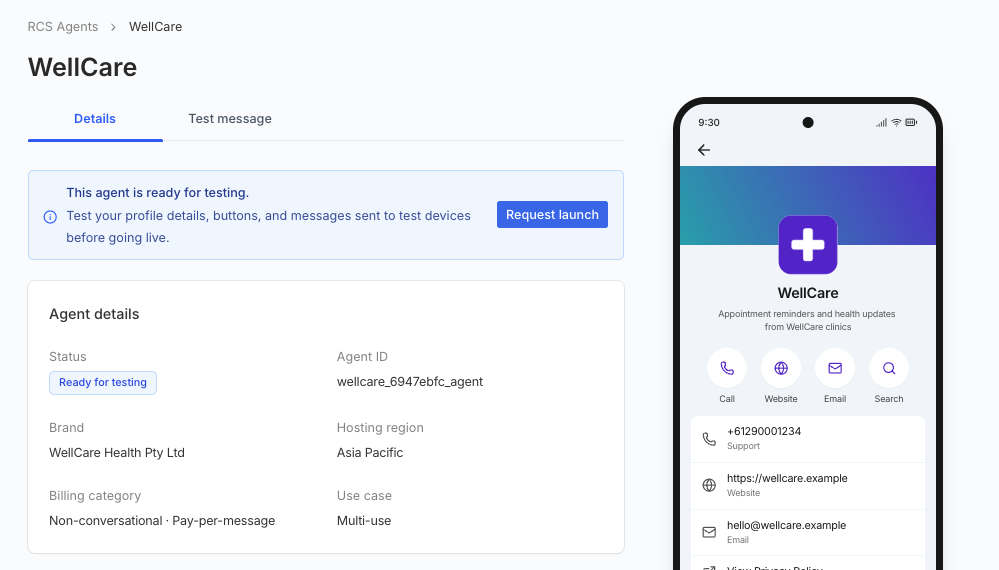
To request launch:
- Open the agent's page. While the agent is Ready for testing, a banner at the top of the page has a Request launch button.
- Select Request launch, select both confirmations, and then confirm. The agent's status changes to Launch requested.
- Kudosity contacts you to complete the business verification that carriers need before they approve the agent.
Approval time depends on the country and its mobile networks. It ranges from a few days to several weeks. See the RCS Country Availability Guide.
When the agent's status is Live, you can message your customers with the same sender and the same API requests that you tested with.
FAQ
Can I create a second agent?
An account has one agent to begin with. If you need another, contact us about your use case.
Can I change the brand, hosting region, billing category or use case?
Not after the agent is created. If one is wrong, contact your account manager. Some changes mean a new agent.
Can I edit an agent after I request launch?
No. The profile is editable only while the agent is Ready for testing. A change to an agent that is launching or live needs Kudosity's help and can mean a new verification.
My country isn't open for RCS yet. Can I still set up and test?
Yes. Create and test your agent now, then request launch when the market opens.
Where can I find a longer walkthrough?
The RCS Onboarding Guide shows every screen of the wizard.
Updated 6 days ago